Saturday, March 27, 2010

Invitation Re-Design!

So last week, I was on Excel checking out my guest list for the wedding. I had inserted a formula a while back to count up how many invitations that I needed to make. The total came out to be 39 invitations total. So I made 39 invitations. Well last week, I decided to reprint my guest list and count up by hand how many invites I needed, and I actually need 58 invitations. CRAP. I should have done it that way from the beginning and I still have no idea how Excel came up with 39 invites. So basically, earlier this week, I needed to get started on embossing 20 or so more invites. I was doing them, and was about to start my 5th one when I caught myself looking at them, and I was unhappy. I want to be proud and happy about our invitations. I know they're just going to be thrown away by our guests, but I want to keep a few of them and frame them. I want to look at them 10, 20, 30 years from now, and still love them. So on Wednesday of this week, my fiance and I went out to Hobby Lobby in search of some inspiration. Some things we wanted to keep the same still..

What we kept the same:
  • The hot pink invitation envelope
  • The hot pink RSVP envelope
  • The sand metallic pocketfolds
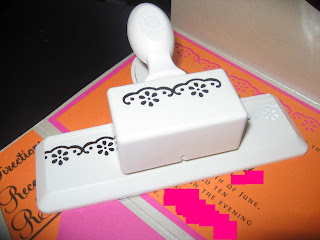
My fiance actually ended up finding our new inspiration for the invites, which was a flower border paper punch. And now I present, our new invitations!


Honestly, these pictures do them absolutely no justice whatsoever. But in person, they are absolutely gorgeous and I am so happy with them! I feel like this huge weight has been lifted off of my shoulders because down deep, I still didn't want to use the other invites, but since I put some much time, money and effort into them.. I was just going to settle. My advice: DON'T SETTLE! Take pride in your work, and be happy with your results. You don't want to have any regrets about your projects. So how do you like them!?

PS. I love how our new paper punch incorporates flowers that are almost identical to the fondant flowers that we are going to create for our cake!

Wednesday, March 24, 2010

Made a Huge Decision Today..

After embossing and assembling about 70% of our invites, I have made the decision to change them. I basically stuck with them this long because I had put so much work in them, but when I looked at them and thought about them, I wasn't happy at all. Sure, they're just going to be thrown away, but I want to be happy and proud of them. Plus, I plan to keep a few of them for a shadow box project after the wedding, and I want to look back at them years from now and still love them. So my fiance and I just spent the past hour in Hobby Lobby looking for inspiration, and my fiance found something that we both love. Maybe now I will actually be happy and excited to complete our invitations instead of just staring at what we have now and not wanting to finish them at all. I'll have a mock-up to show you this weekend!

Monday, March 22, 2010

Revision of the Table Numbers.. Check!

My fiance found these adorable photo holders at Hobby Lobby marked 40% of $1.67, and since we loved them, I knew that my original table numbers weren't going to work as well. Here is what we plan to do now!
It is kind of hard to tell, but what I actually did was enlarge some numbers in a Word document to 200 and print them off. then I took some scissors and cut out the numbers. Then, I printed off one of our engagement pictures. I taped the number backwards on the back of the photo, and cut around it with a box cutter. Then, I taped a small piece of orange cardstock behind it then glued the whole thing to a piece of hot pink cardstock. I will post actual directions once I get started on making more of them! 


In this last one, you can kind of see where the photo is separate from the orange paper and where I cut.

Escort Card Table Centerpieces - Check!


Yesterday was a pretty low key Sunday, so I took the time to complete my first of three escort card table centerpieces. I plan to make one more hot pink one and an orange one. Have a look!


And here is my dog, Liberty, begging me to stop with all the wedding stuff and pay attention to her..

Bride's Bracelet - Check!

I had some left over glass pearls after making the pearl necklaces for my bridesmaids, and I wasn't looking to spend a lot of money on something that I would only wear for one day, especially since I never wear bracelets. I'm not wearing a necklace for the wedding and I bought my beautiful earrings a while back, but I thought about wearing possibly a bracelet to compliment them. But anyways, enough jibber jabber.. here is my final product!
It is just really simple, and I matched it with my real pearl earrings and you can't even tell a difference. I'm excited to wear it!

Finally! Centerpiece Mock-up .. Sort Of

So after my original centerpiece mock-up fiasco, my mom and I went in search of new ideas and inspiration. We finally found it at Hobby Lobby. They are taller/slimmer aluminum pails. We had to buy them in assorted colors since they didn't have enough of one single color, but that's no problem since my fiance was going to paint them white for me anyway. But here is the pail after it was painted..
The inside of them haven't been painted yet, but in due time!
Since the "theme" of our wedding is revolved around bright colors and gerbera daisies, I loved how these had incorporated flowers around of the rim to kind of "fit" our theme.

Here is a semi-mock-up of a centerpiece.. keep in mind that it still needs a lot of work!
This only has 6 daisies in it right now, but our final products will have at least 9 in them with 3 orange, 3 hot pink and 3 yellow. Also I'm thinking about sitting them on top of our cloth napkins and with some votives or colored stones sprinkled around it. I plan to fill the pails with colored stones to hide the flower foam at the bottom of it.
I will have a full centerpiece mock-up to post in a few weeks!

Monday, March 15, 2010

Cake Trial No. 1

My fiance and I just completed our first cake trial. Since we are on a tight budget, we have decided to bake and decorate the cake on our own. We baked it yesterday and let it sit overnight in the freezer to harden some. We didn't buy enough cake mix, so our layer is only half the size it should be, but we know for next time! This was our first time using fondant so that was definitely an experience. I LOVE to watch cake shows with Amazing Wedding Cakes, The Cake Boss and Ace of Cakes being some of my favorites. So I wasn't completely clueless as to what to do. I definitely need to practice some more though.

But anyways, without any further ado, here is our first cake trial...!

So not too terrible right? I think we did pretty darn good for our first time!
Just a reminder, here is the look we are going for..
 I think we are well on our way there! What do you think?

Monogram Table Runner - Check!

Boy am I glad this one is done. It took roughly 8-9 hours to complete. Anyways.. here it is! (The blurred out portions are where our names are displayed.)


I decided to add some artificial daisies to the monogram to give it some more dimension, and I added those with hot glue.

Materials Needed:
  • Table Runner (I ordered mine from linentablecloth.com and it is roughly 38" wide.)
  • Fabric Paint
  • Paintbrush (I used a small thin paintbrush to make the lines a lot cleaner.)
  • Enlarged Monogram (I got our monogram blow up at Kinko's for $3.00.)
  • Pencil
  • Wax Paper
  • Tape
Directions:

1. Start with a large flat surface and tape your enlarged monogram down onto the surface.
2. Lay your table runner over the enlarged monogram, and with a pencil, trace the monogram onto your runner. Don't press the pencil into the runner too hard, but enough so you can see where to paint. You don't want pencil lines to show on your final product.

3. Fold back your runner, and tape wax paper over your flat surface. You'll want to do this because the paint will leak through the runner and attach to the surface. Wax paper will prevent this from happening and will easily release the dried on paint.
4. Place your runner back over the wax paper area, and begin painting. I STRONGLY urge that you use fabric paint because it won't bleed, and the end result will look a lot better.Also, depending on your monogram, depends on how long it will take you to paint the entire runner. I had four colors in mine, and had to take breaks in between the colors to let them dry. Also mine involves many small details, so that also made the process longer.

Overall, I very happy with it. I can't wait to display it over our gift table at the reception. I also plan to keep it and turn it into a piece of wall art after the wedding is over!

Centerpiece Nightmare

Well I didn't get as much done over Spring Break as I would have liked. I attempted to do our centerpiece mock-up last Tuesday night. Boy was that fun!...NOT. If you remember,  the centerpiece that I wanted to do consisted of a  bubble bowl vase and fruit slices. I couldn't get it the way that I wanted AT ALL. I was so disappointed, and I ended up cutting my finger pretty badly during the process, so I gave up on it. So all day last Saturday, my mom and I went in search of a new vase for the centerpieces. Well we came up short until we got to my favorite store, Hobby Lobby. They didn't have any vases that I wanted, but when I went back to this 40% off section of Spring items, I found these elongated aluminum pails for sale. They're in assorted colors, but I really liked them, so my fiance spray painted a sample of one white for me, and it is absolutely perfect. So I was able to exchange all of the bubble vases that I had bought for these aluminum pails at no additional charge. We need to spray a second coat of paint on it still, otherwise I would have had a picture to show you all, but since it was wet and really cold yesterday, the paint wouldn't dry. So we will hopefully be able to try again today! At some point today, I should be able to share with you all my NEW centerpiece mock-up, as well as my painted table runner monogram that I finally finished. Stay tuned!

Wednesday, March 10, 2010

Memorial Candles - Check!

This is still a work in progress since I haven't received photos of my fiance's deceased loved ones yet. So the only one I could complete was my grandmother's memorial candle right now, and I think it turned out beautifully. I wanted to do something differently to honor our loved ones that are no longer with us instead of the usual paragraph in the program, so I sought out different inspiration, and I definitely found it. As our guests enter the reception, they will be faced with our escort card table to their left and the memorial table to the right. Anyways.. here it is!
This photo certainly does it no justice. But what I did was buy a 6 1/2" x 10 1/2" vase, and I created a 6 1/2 x 11 document in Microsoft Publisher. I inserted my grandmother's photo, then inserted three separate text boxes. In the first text box, I wrote, "In Loving Memory Of,", the second, "Her Name," and the third, "Grandmother of the Bride." Then I inserted a fourth and final text box that lined the entire document, and then turned it a light gray color. I did this so that I would know where my cutting points were once I printed it off. I printed it off, cut it to size, wrapped it around the vase and held it will tape. Then, I used some thin satin ribbon to line the edges of the vase. I used my hot glue gun to make it stay. It was really simple, and easy to do overall. It probably took me a total of 20 minutes to do from start to finish. On wedding day, I plan to insert a small candle into the vase and light it, so that the photo and words will illuminate.

I found this DIY to be very sentimental to me, and I'm glad to have done it. I believe that it will definitely honor our deceased loved ones and truly make them apart of our special day more.

My Table Runner Monogram - Still A Work In Progress

Well I had a minor snafu with my painting our monogram onto the table runner yesterday. Everything was going so well! I had traced it on, and it looked great, but then it came to painting. I used acrylic paint, which I thought would work wonderfully... nope! The paint ended up bleeding beyond the lines of my monogram, and it just looked awful. I took some pictures to show you..
EEK!
So today is a new day, and I went out to Hobby Lobby yesterday and purchased some fabric paint. Now, I'm just going to use the opposite side of this runner, and my messed up monogram side will be against the wall on wedding day so no one will even notice! Hopefully I'll have pictures up later on to show you all how it turns out this time!

Monday, March 8, 2010

Thank You Parasol - Check!


I absolutely fell in love with this next project, and constantly argued with myself back and forth about doing it or not. I was worried about whether I could do it or not, or if I would mess it up! But I decided to give it try and hope for the best. And here it is.. !
I did it! YAY! Haha now onto my directions for making one of these bad boys for yourself!

Materials Needed:

  • White Parasol - The one I bought is 32" in diameter.
  • Black Acrylic Paint
  • Small Paintbrush
  • Black Sharpie - I used a fine tip sharpie pen.
  • Pencil
  • Scissors/Exact-o Knife
  • Cardstock
  • Tape
Directions:
    1. Create a 25x25 document in Microsoft Publisher. Insert two text boxes, one for each word.
    2. In the text boxes, write "Thank" in one, and "You" in another. Then, enlarge the text to 700 and bold it. Then, choose which font you would like to use. I wanted to keep the same script for the parasol that I have used on all of my other wedding stationary, which is Feel Script. You can use one text box if you prefer, but I found that by having them separated, I could make the words fit better into the document.
    3. Print off your document, and organize it like a puzzle. As you can see, I turned my "You" upside down in the document to make it fit better.
    4 . Now comes the time consuming part, cut out all of your letters and tape together the portions that became separated when printed.
     5. Open your parasol, and lightly tape the stencil onto your parasol.
    6. Using your pencil. trace the stencil onto your parasol. Don't press too hard, as to not rip the parasol.
    7. Using your sharpie, trace over your pencil. I used a Sharpie fine-point pen because I found that a thicker Sharpie has a larger tip and smears a lot more than the Sharpie pen.
    8. With your black paint and small paintbrush, paint the letters. If you mess up a little, don't fret! You can fill in some minor odds and ends with your Sharpie.

Friday, March 5, 2010

Pearl Necklaces for Bridesmaids - Check!

I saw this idea over and over again on The Knot, so I decided to give it a try because I liked them! The ones that I found being done had a satin ribbon attached to them, but after some thought, I decided not to use the ribbon and used regular necklace clasps.

Materials Needed:

  • Bead Wire
  • 8mm Glass Pearl Beads
  • Crimp Pliers
  • Crimp Beads
  • Necklace Clasps
What I Used..

Directions:
  1. Measure out 24 inches of your bead wire, and 55 glass pearl beads. The pearls that I bought only came in sets of 50 glass pearl beads, so I bought an extra pack to add the additional 5 beads. I wanted to make the necklaces a tad bit longer since at 50 beads, they were more choker-style necklaces.
  2. Add 1 crimp bead, then add one side of the necklace clasp.
      3.  Loop the end of the bead wire back through the crimp bead a second time to secure the necklace  clasp from slipping off.
      4.  Close the gap that the loop created between the clasp and the crimp bead. Then using your crimp pliers, crimp your bead closed.
      5.  Now string 55 glass pearl beads onto your bead wire. 
      6.  Once all of the pearl beads are added, repeat steps 2-4 to secure the loose end.
All done!
These weren't time-consuming AT ALL. It took me about an hour to complete 4 of them. I hope that my bridesmaids like them as much as I do!
Related Posts Plugin for WordPress, Blogger...